Queen Anne Chair Construction –
This is an excerpt from “The Woodworker: The Charles H. Hayward Years: Volume IV” published by Lost Art Press.
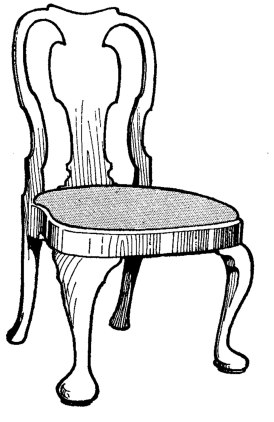
Most readers know that the vast majority of chairs are made by tenoning (and sometimes dowelling) the seat rails into the legs. Normally there is no difficulty, the mortises (or occasionally the tenons) being at a slight slope to allow for the splay of the rails. In certain period chairs, however, this is awkward in that the plan shape of the seat is curved. There are no angular front corners, the whole thing taking the form of a continuous sweep as in the Queen Anne chair shown in Fig. 1. Thus to enable the rail shoulders to be square the top rectangular portion of the leg has to be cut down considerably as at A, Fig. 2. This means a loss of strength in itself, but in addition there is a little wood left in which the mortises can be cut. In fact there is only the roughly triangular shape left, and the tenons are necessarily restricted in length. Furthermore the shape of the rails means that there is a great deal of cross grain.
Still, this system of construction was sometimes followed, and the craftsmen got over the difficulty by fixing stout inside brackets (see shaded part at A, Fig. 2). These had the effect of binding the two rails together. Since the brackets might be anything up to 2 in. thick the strength was sufficient for the job.


Alternative Construction. The awkward form of construction must have been realised, however, and this, no doubt, was the reason for the alternative method by which the front and side rails were halved together, the shape cut in them, and the leg either tenoned or dovetailed up into the frame so formed. The dotted lines show the squares of timber required to enable the shape to be worked, and it should be noted that the inner shape is plotted so that the thickness is considerably wider over the legs, so avoiding much loss of strength owing to short grain.
Fig. 2, C. shows the first stage in which the parts are halved together, and the rear shoulders marked round. In practice the craftsman probably cut and fitted the rear tenons first as it would be awkward to fit them after the frame was assembled. After cutting the tenons the halved joints would be glued up as at C and, the glue having set, the shape sawn out as at D, Fig. 2. Some chairmakers preferred to cut tenons at the top of the legs, and corresponding mortises had to be chopped in the frame. Others cut a dovetail shape as at D, Fig. 2, and formed a notch to receive it in the outer surface of the frame as shown by the dotted lines. In either case the dovetail or the tenon passed right across the halved joint and so served to bind it together.
It will be realised that all these Queen Anne chairs were cross-veneered around the rails, and this hid any unsightly joints. The top-moulding forming the rebate for the loose seat was either planted on the top edge, or was let into a rebate worked around the edge before veneering.
— MB