Grinding an Axe –
The best recommendation a carpenter can possess is a good kit of tools, well worn and in fine condition. A chest full of brand-new tools, however nice they may look, is of no use as a recommendation, for it is evident that the man has never used them. When the tools are half worn out, and still are in good condition and ready for instant use, they form pretty good evidence that their owner understands his business.
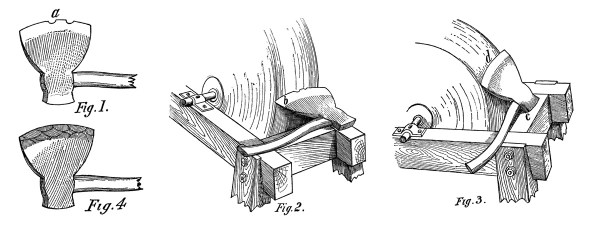
In looking over a piece of kit possessed by a “wood butcher” not long since, the writer saw an axe which looked like the one shown in Fig 1. There was a big piece broken out of the edge at a, where a spike had evidently come in contact with the edge of the tool. To put this tool in shape considerable grinding must be done.
The first step is to hold the axe against the edge of the grindstone, as shown in Fig 2, until the broken part is entirely removed, leaving the edge at b probably about one-sixteenth of an inch thick. The next step is shown in Fig 3. Rest the head or pole, of the axe, upon the grindstone frame, making a mark at c, so as to be able to replace the axe at will after looking at it. By resting the head of the axe at all times at c, the bevel at d is made flat, and not as shown in Fig. 4. Here there are something more than a dozen different bevels, to say nothing of a corner being ground off where the axe evidently slipped when being placed upon the stone.

In Fig. 5 the axe is shown bearing upon one corner of the head, so that the corner of the blade diagonally opposite at a is being ground. In Fig. 6 this position is reversed; the axe bears upon the other corner of the head, and corner b of the blade is bearing upon the stone. This enables all parts of the blade to be ground, and at the same time keep the bevel straight and true. After finishing the grinding operation, which should be stopped before a feather edge is raised, attention should be given to setting the edge of the axe with an oil-stone or an Arkansas slip.
Some workmen sharpen an axe in the manner that they would a plane, holding it upon the oil-stone as shown in Fig. 7, rubbing the axe back and forth, using both hands, and sometimes needing another one to hold it in position. A much better method is exhibited by Fig. 8. Rest the axe against the edge of the bench, or a convenient timber, as shown at a b; then grasp a slip in the right hand and with it bring the axe to an edge as shown at c. This method possesses the advantage that the edge of the axe is in sight at all times, and the whetting operation can be stopped the moment the axe is brought to an edge.
When “going it blind” with the axe the other side up, and being rubbed upon a stone, it is hard to tell when it is just to an edge, and this in addition to the fact that a hand axe is very heavy and not easily held in the desired position for whetting, renders the edge-setting problem one that is not often properly solved.
Should at any time a feather edge be raised upon the axe, the roughness in question should be carefully removed before further grinding or whetting takes place. The feather edge is quickest and best removed by drawing the edge of the axe over the grindstone, or one corner of the oil-stone. It does not pay to try to scrape it off on one corner of a piece of wood, as is often done when grinding a plane iron. The axe is heavy and more bungling to hold. A fine file will bring it to time when incidentally the mechanic permits this tool to indulge in the feather edge business.
When an axe becomes considerably worn, it should be taken to the blacksmith, drawn out thinner, and if necessary, a new piece of steel welded on before the drawing-out process takes place. In attempting to “new lay” an axe, the smith should chip off the old steel before attempting to weld on a new piece. Sometimes trouble occurs in making steel adhere along its entire length. There may be a bit at one corner or a chunk in the middle which refuses to unite.
The rest of the weld being solid. In such cases, raising up the parts with a cold-chisel where they fail to unite, having the axe hot at the time, and driving into the cavity a piece from an old scythe blade, or a bit of clean, bright Swedish iron, the whole may then be hammered close together, liberally dosed with borax, and again take a welding heat. No trouble with be experienced in the parts not uniting after such a treatment.
James F. Hobart
The Manufacturer and Builder – February 1892
– Jeff Burks